This is the multi-page printable view of this section. Click here to print.
Volume Guides
- 1: Volume Attachment Limits
- 2: Volume Backup & Restore
- 3: Volume migration
- 4: Volume Retype
- 5: Windows volume offline after restart
1 - Volume Attachment Limits
Overview
If you need to attach more than the default limitation of volume attachments, then this is possible by using a custom image and changing the properties of the image to use a non-default scsi driver.
Please note that any servers created before the image properties are set need to be re-created in order to use the updated driver.
The following properties need to be set in order to achieve this.
hw_disk_bus=scsi
hw_scsi_model=virtio-scsi
Volume attachment limits
| Driver | Max volumes per server |
|---|---|
| Default | 26 |
| virtio-scsi | 128 |
Openstack CLI examples
Creating a new image (note that additional options are also needed when creating images, please refer to the Openstack documentation for more information)
openstack image create --property hw_disk_bus=scsi --property hw_scsi_model=virtio-scsi ${IMAGE_ID}
Updating an existing private image
openstack image set --property hw_disk_bus=scsi --property hw_scsi_model=virtio-scsi ${IMAGE_ID}
2 - Volume Backup & Restore
Overview
Volume backups in Elastx OpenStack uses Swift as the storage backend. This means that your backups will automatically be placed in all availability zones. This guide will help you get started with how to create volume backups and how to restore them using OpenStack’s Horizon and CLI.
Backup and restrore from Horizon
Backup from Horizon
- Navigate to “Project” → “Volumes” pick the volume you want to backup and choose
Create Backup
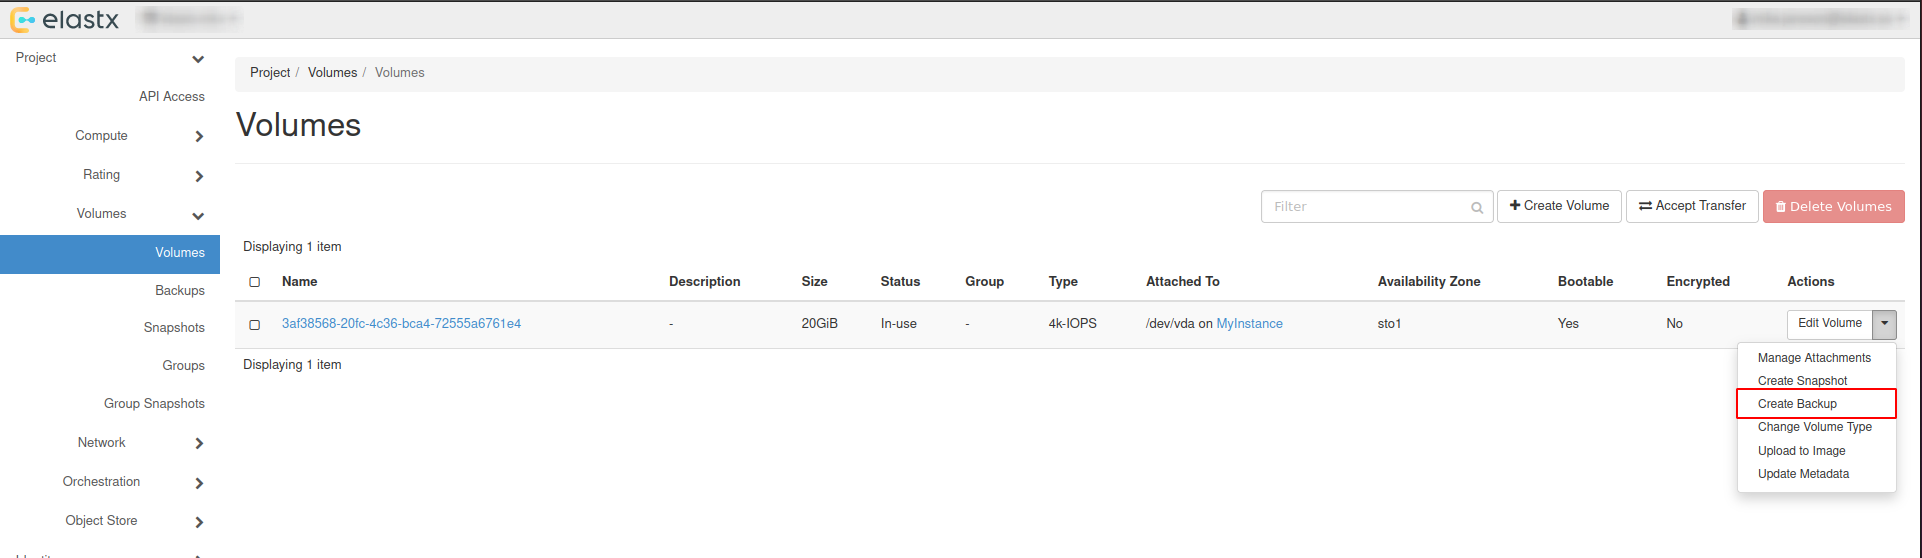
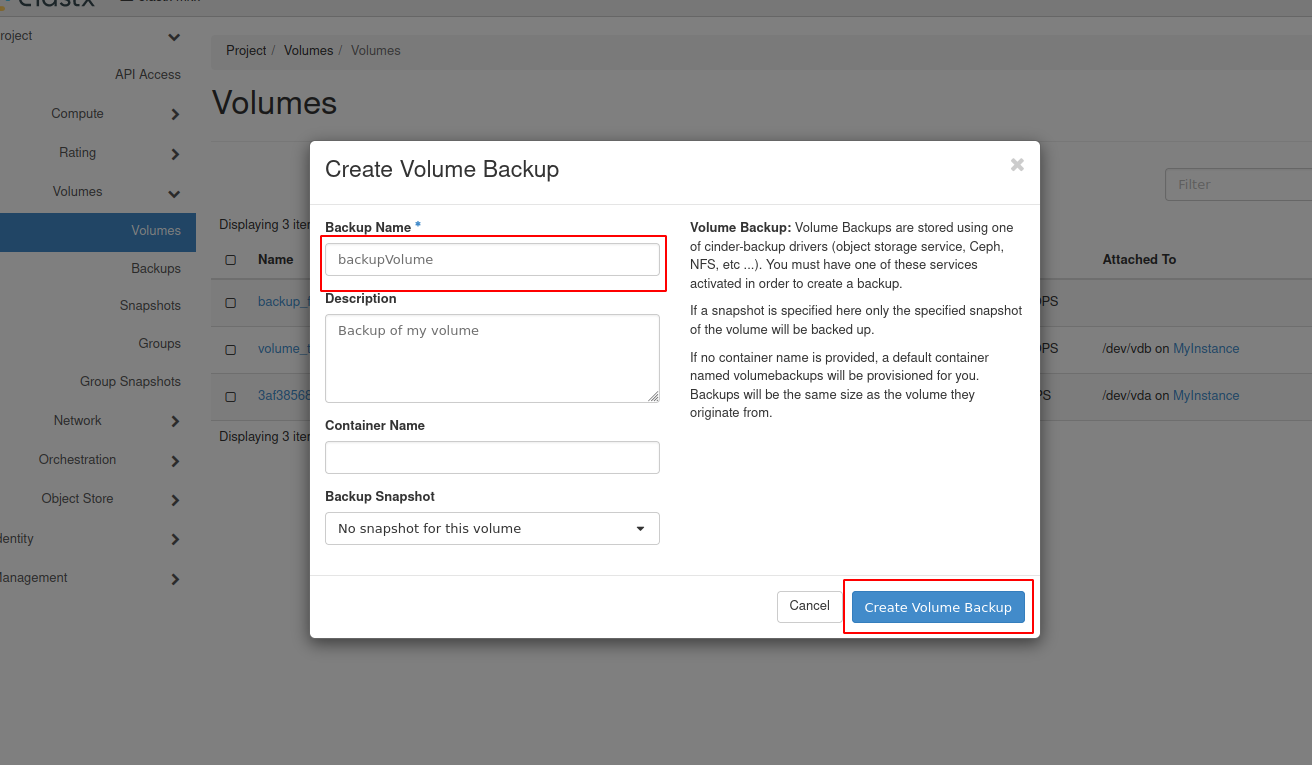
- In the pop-up window, add a name and a description of your liking and press
Create Volume Backup.
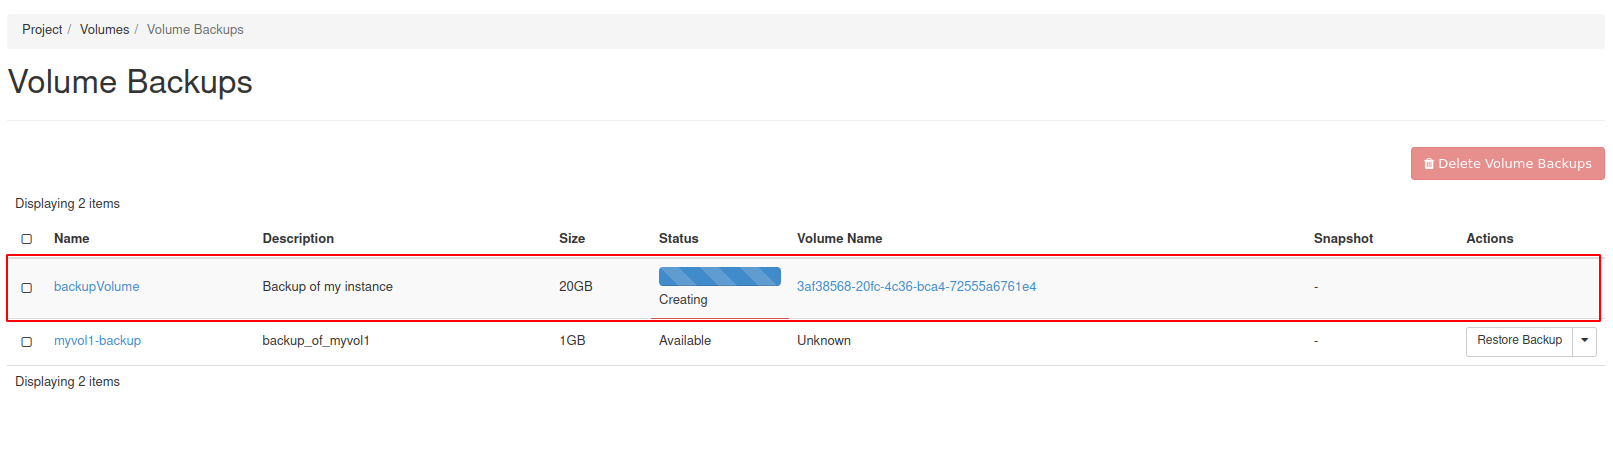
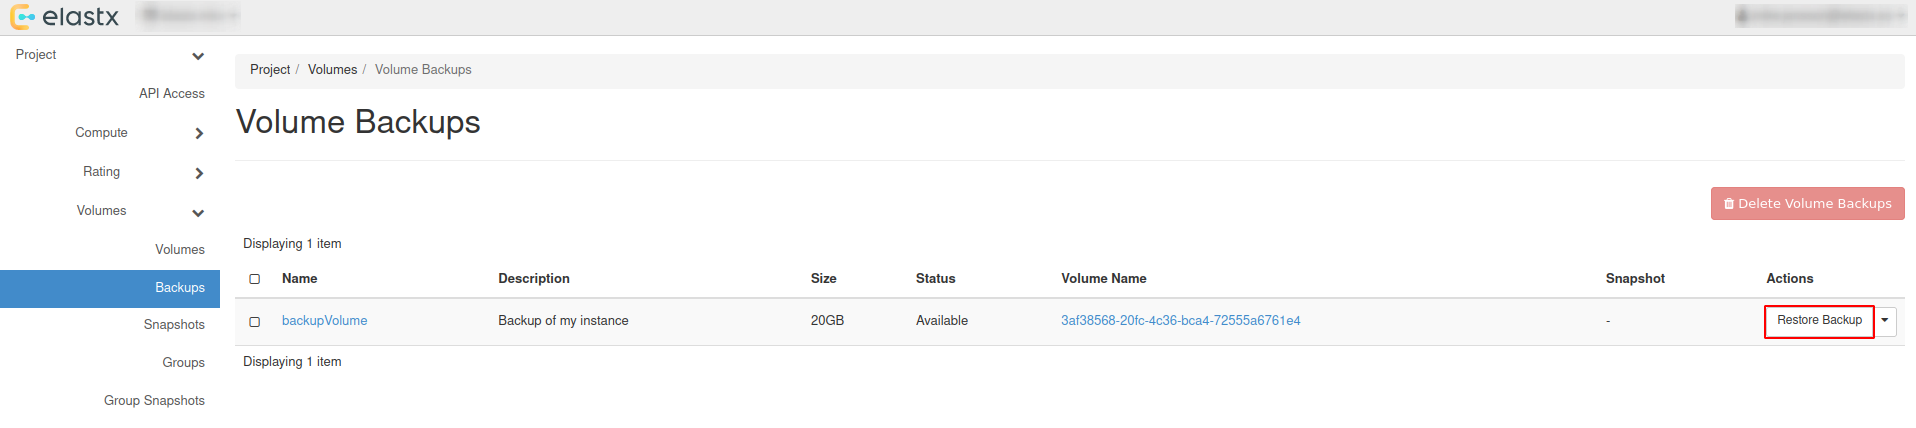
- Navigate to “Project” → “Volumes” → “Backups” to see the backup status.
Restore from horizon
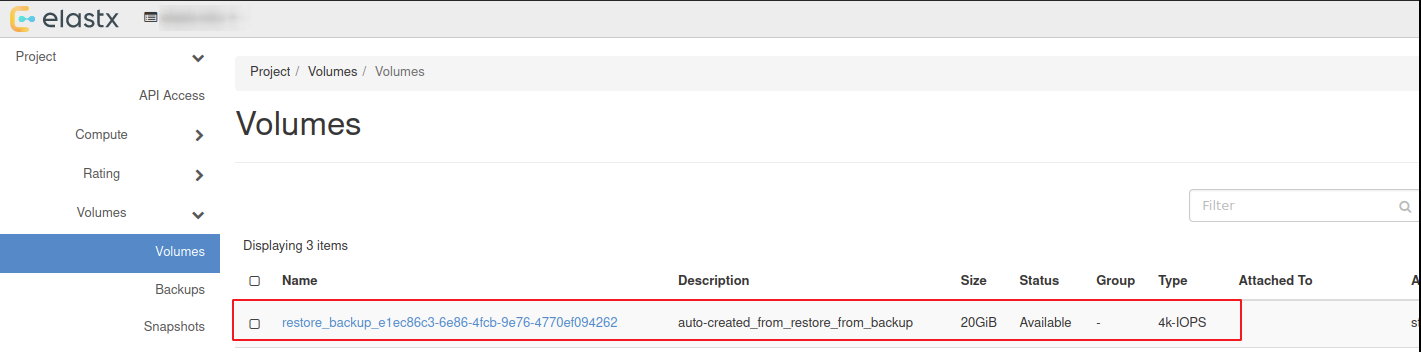
Restoring from backups can be done in two ways, one way is to create a new volume manually from the “Project” → “Volumes”, or to have the volume automatically created when restoring from the “Project” → “Volumes” → “Backups”.
Beware: If option two is chosen, the Availability Zone and Size gets chosen automatically. This means that the volume might end up in a different Availability Zone than intended.
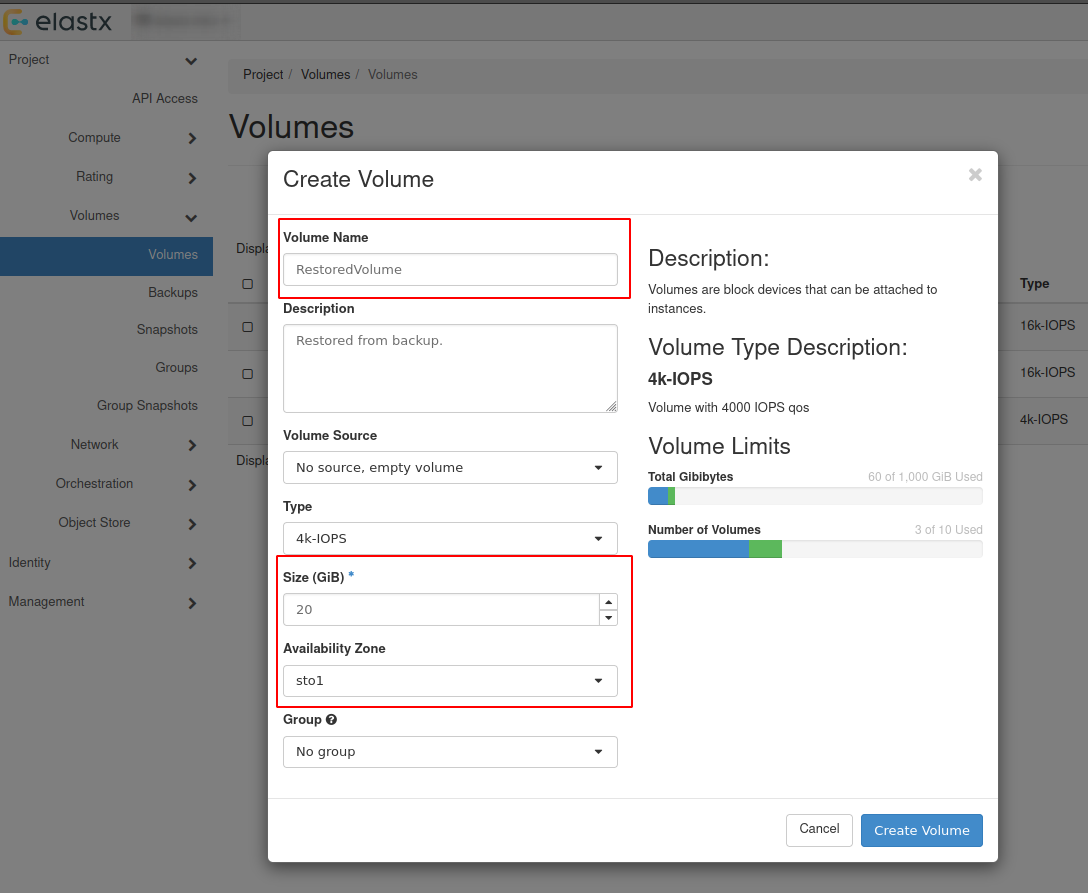
Option #1 - Create volume and restore from backup
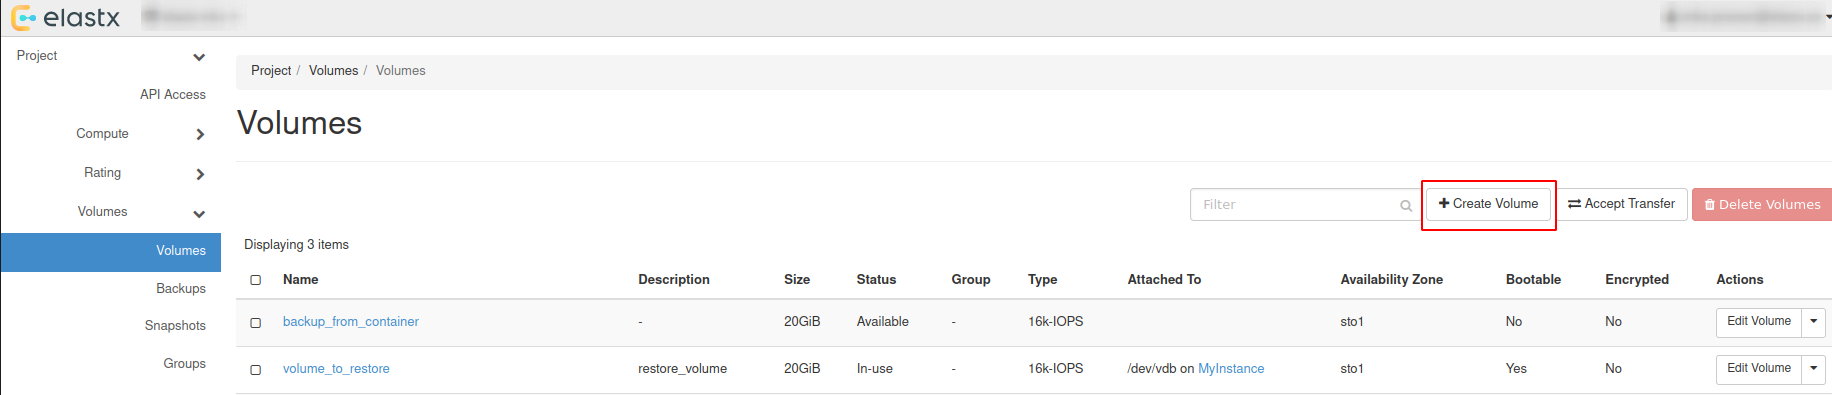
- Navigate to “Project” → “Volumes” and press
Create Volume.
- Choose a name, description and size of your liking for the new volume.
Beware: Volume Size has to be at minimum the size of the backup. The Volume also has to be in the same Availability Zone as the instance it will be attached too.
- Navigate to “Project” → “Volumes” → “Backups” and press
Restore Backup.
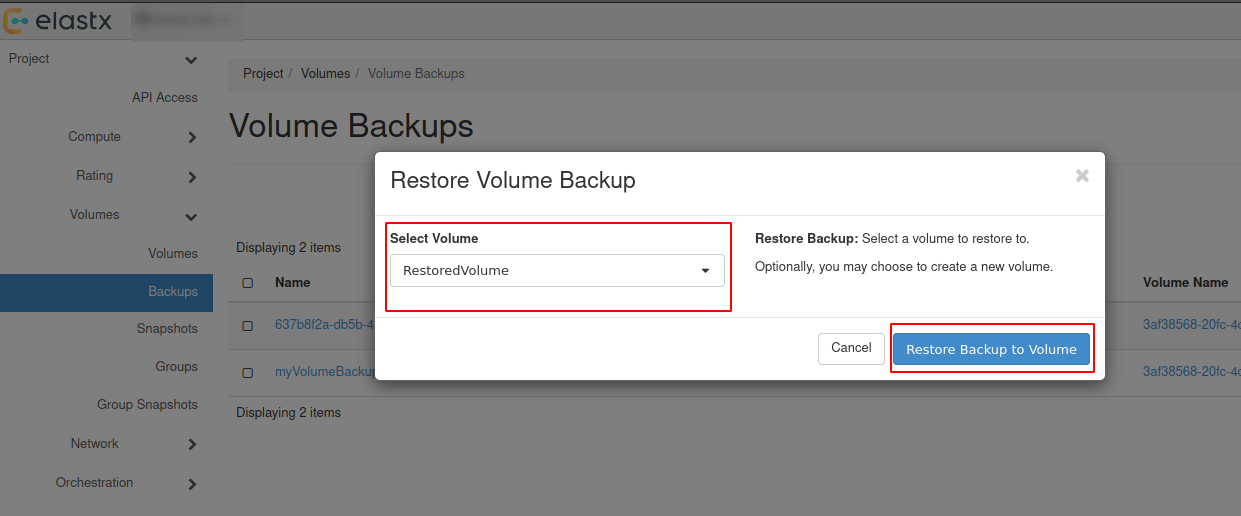
- Select your newly created volume and press
Restore Backup to Volume.
Option #2 - Restore backup without selecting a volume
Beware: See the note about availability zones and sizes above.
- Navigate to “Project” → “Volumes” → “Backups” and press
Restore Backup.
- Select
Create a New Volumeand pressRestore Backup to Volume.
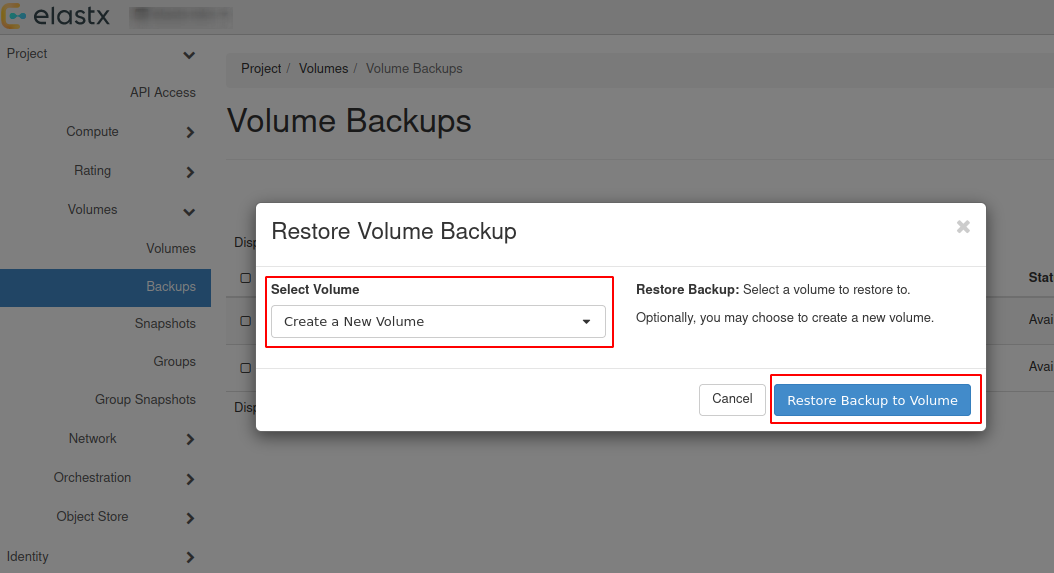
- The restored backup will be available in “Project” → “Volumes”.
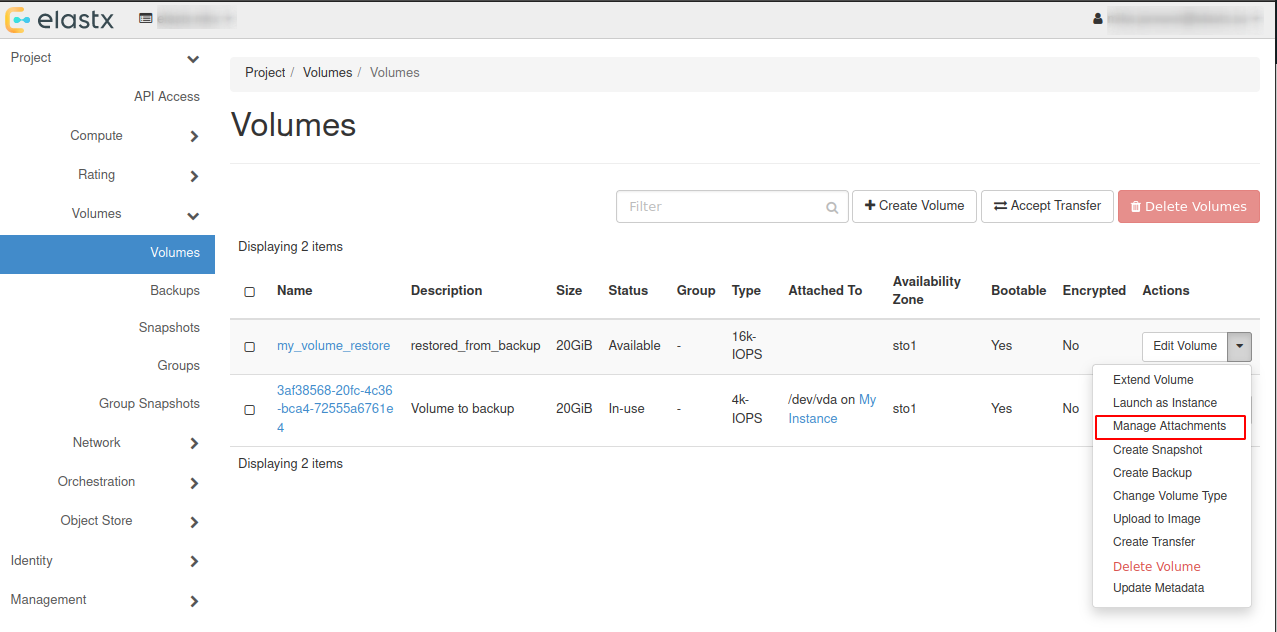
Attach & Detach volumes from horizon
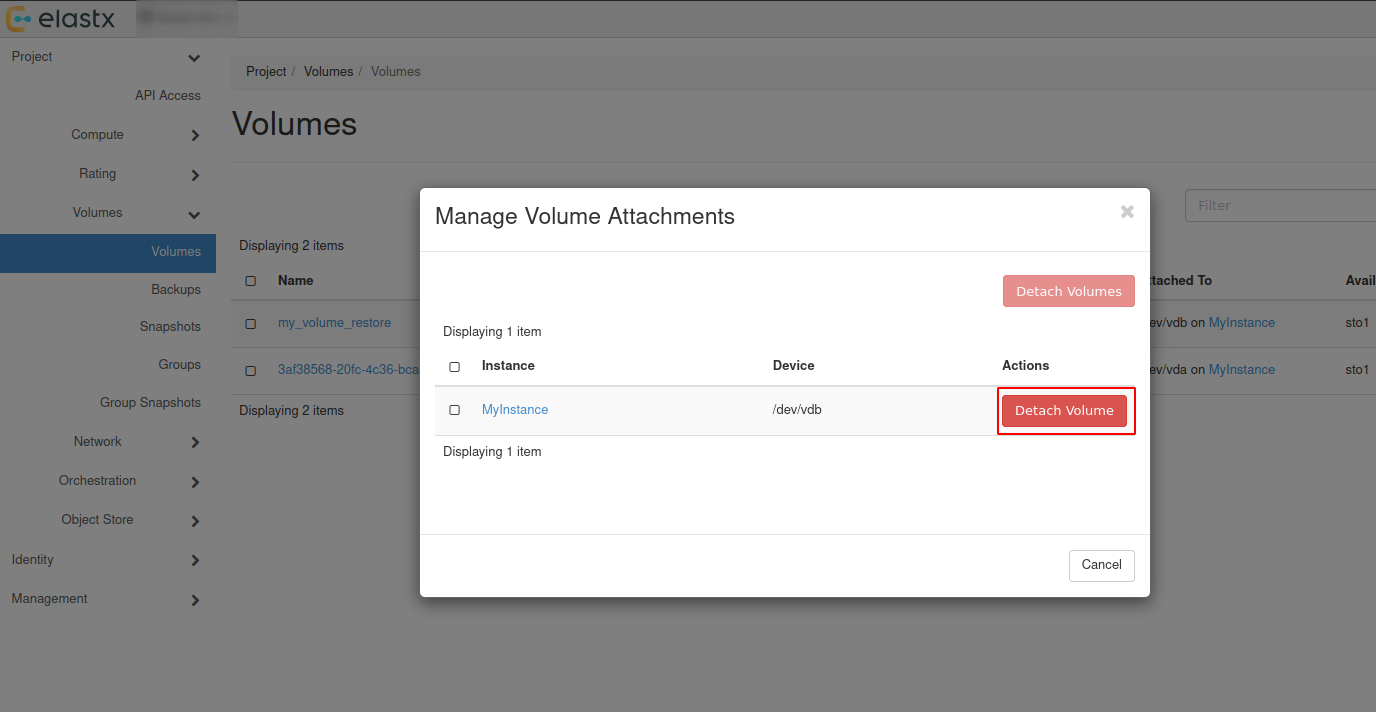
- Navigate to “Project” → “Volumes” and press the ⬇ arrow next to
Edit Volumeon the volume you want to attach and then pressManage Attachments
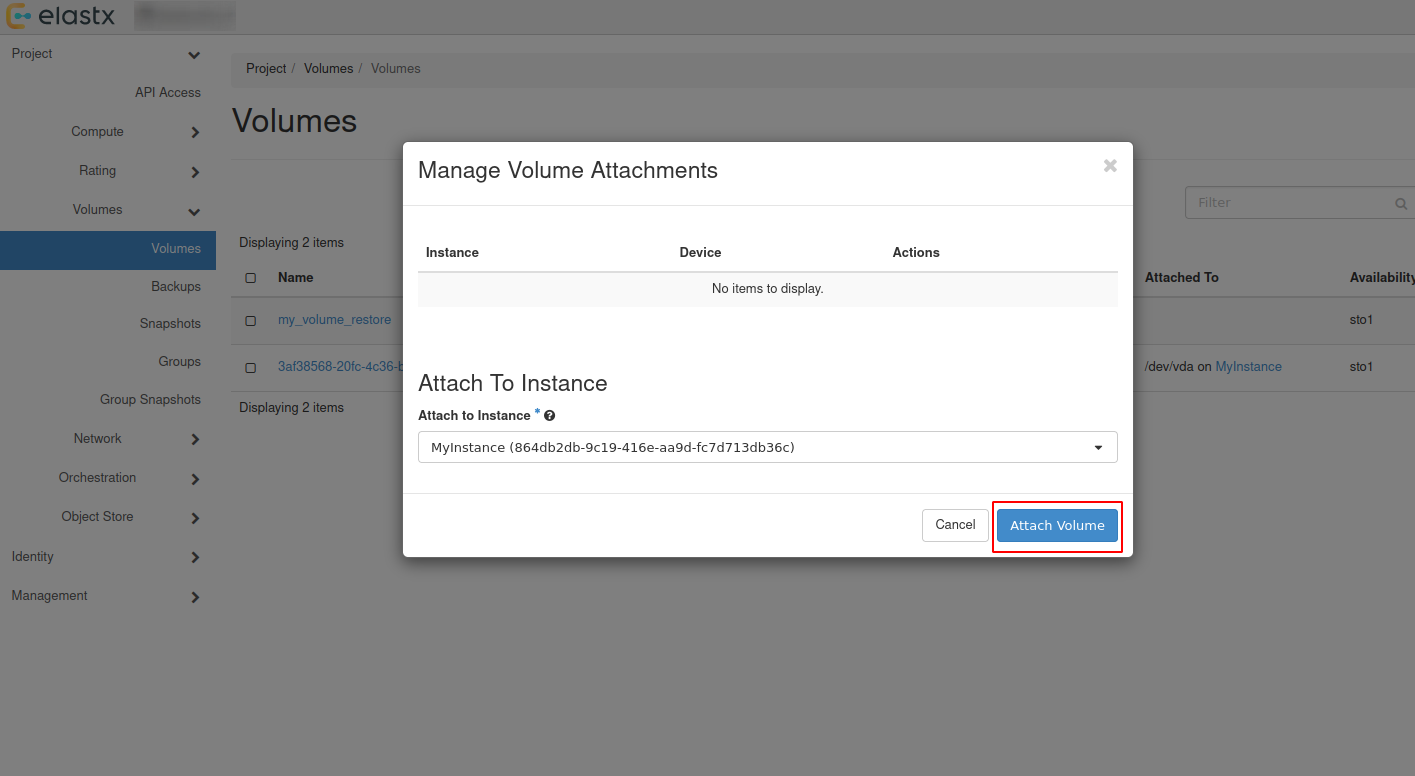
- In the pop-up window choose an instance you want to attach the restored volume to.
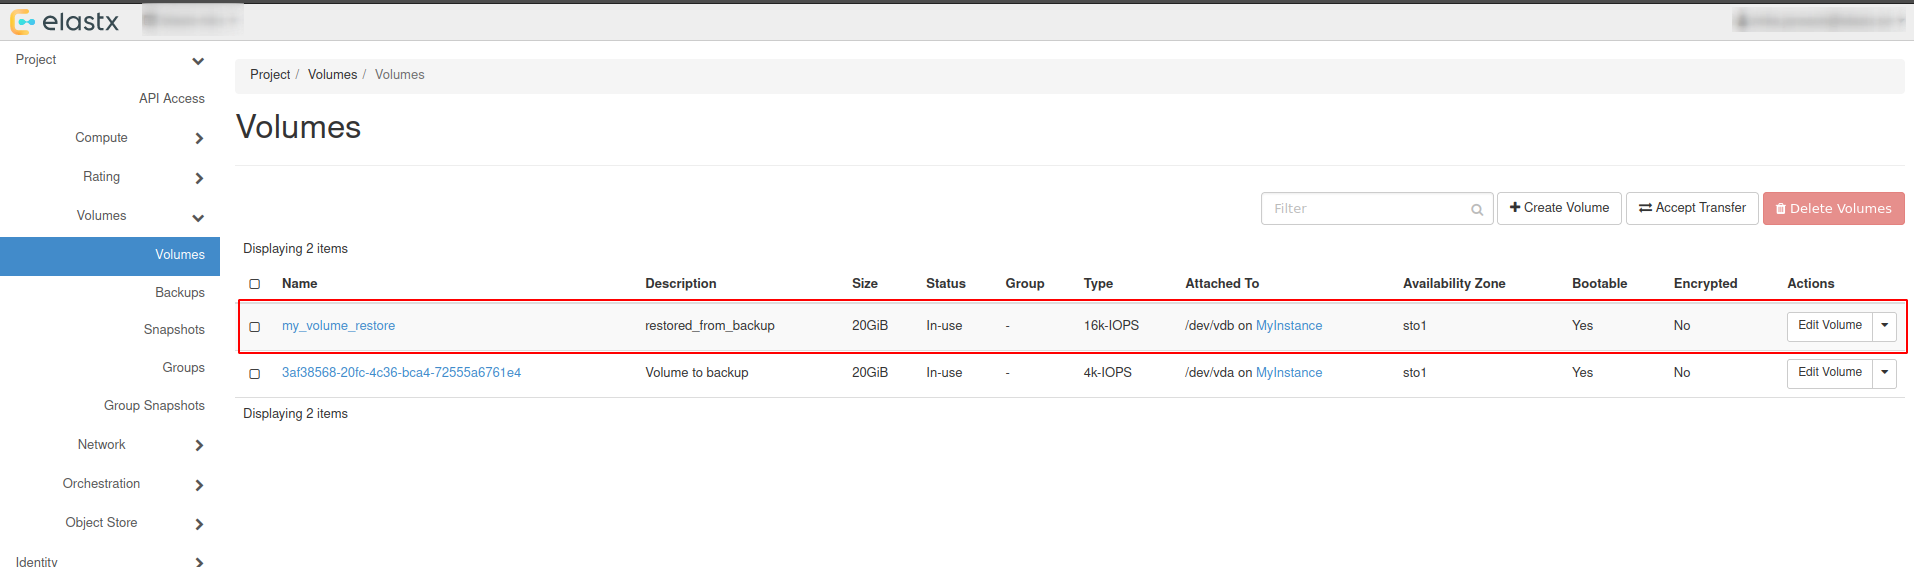
- Check volumes again in “Project” → “Volumes” to see if the volume is attached to the instance.
- To detach the volume, Navigate to “Project” → “Volumes” and press the ⬇ arrow next to
Edit Volumeon the volume you want to detach and then pressManage Attachments. In the pop-up window choose the instance you want to detach the volume from.
Backup and restore using openstack-cli
Backup using cli
- List all volumes:
$ openstack volume list

+--------------------------------------+----------+--------+------+-------------------------------------+
| ID                                   | Name     | Status | Size | Attached to                         |
+--------------------------------------+----------+--------+------+-------------------------------------+
| ce29137e-d7d7-45a6-ae63-bb6605af5335 | myvolume | in-use |  100 | Attached to myinstance on /dev/vdb  |
+--------------------------------------+--------------------------------------+-----------+------+------+
- Create backup of your selected volume:
Beware: If the volume is attached to an instance you’ll need to detach it first or use
--forcewhen creating the backup.
$ openstack volume backup create ce29137e-d7d7-45a6-ae63-bb6605af5335 --name mybackup --description "my backup" --force

+-----------+--------------------------------------+
| Field     | Value                                |
+-----------+--------------------------------------+
| id        | b014e2c4-42a9-44d5-af9b-60f3cf7ecfc9 |
| name      | mybackup                             |
| volume_id | ce29137e-d7d7-45a6-ae63-bb6605af5335 |
+-----------+--------------------------------------+
- When the backup is finished, the status will change from creating to available.
$ openstack volume backup list --volume ce29137e-d7d7-45a6-ae63-bb6605af5335

+--------------------------------------+----------+-------------+-----------+------+-------------+----------------------------+
| ID                                   | Name     | Description | Status    | Size | Incremental | Created At                 |
+--------------------------------------+----------+-------------+-----------+------+-------------+----------------------------+
| b014e2c4-42a9-44d5-af9b-60f3cf7ecfc9 | mybackup | my backup   | available |  100 | False       | 2026-01-23T11:18:01.000000 |
+--------------------------------------+----------+-------------+-----------+------+-------------+----------------------------+
Restore using cli
Restoring from backups can be done in two ways, one way is to create a new volume manually or to have the volume automatically created when restoring. Size must be at minimum the size of the backup.
Beware: If second option is chosen, the Availability Zone and Size gets chosen automatically. This means that the volume might end up in a different Availability Zone than intended. Volume size must be at minimum the size of the backup.
- List available backups:
$ openstack volume backup list

+--------------------------------------+----------+-------------+-----------+------+-------------+----------------------------+
| ID                                   | Name     | Description | Status    | Size | Incremental | Created At                 |
+--------------------------------------+----------+-------------+-----------+------+-------------+----------------------------+
| b014e2c4-42a9-44d5-af9b-60f3cf7ecfc9 | mybackup | my backup   | available |  100 | False       | 2026-01-23T11:18:01.000000 |
+--------------------------------------+----------+-------------+-----------+------+-------------+----------------------------+
- Create a new volume to restore from the backup:
$ openstack volume create my_volume_restore --availability-zone sto2 --type v2-4k --size 100 --description restored_from_backup

+--------------------------------+--------------------------------------+
| Field                          | Value                                |
+--------------------------------+--------------------------------------+
| attachments                    | []                                   |
| availability_zone              | sto2                                 |
| backup_id                      | None                                 |
| created_at                     | 2026-01-27T08:37:22.083078           |
| description                    | restored_from_backup                 |
| encrypted                      | False                                |
| group_id                       | None                                 |
| id                             | 6b5b8d28-d6c1-4da0-8659-d607670f5ed9 |
| multiattach                    | False                                |
| name                           | my_volume_restore                    |
| size                           | 100                                  |
| status                         | creating                             |
| type                           | v2-4k                                |
| updated_at                     | None                                 |
| volume_type_id                 | 565d82f0-238d-4f90-9aa4-172f0594bd58 |
+--------------------------------+--------------------------------------+
- Restore your selected backup to the newly created volume:
Beware: You’ll need to use –force to be able to restore backup to your newly created volume. Make sure to select the correct volume as this will overwrite any existing data.
$ openstack volume backup restore mybackup my_volume_restore --force

+-------------+--------------------------------------+
| Field       | Value                                |
+-------------+--------------------------------------+
| id          | b014e2c4-42a9-44d5-af9b-60f3cf7ecfc9 |
| volume_id   | 6b5b8d28-d6c1-4da0-8659-d607670f5ed9 |
| volume_name | my_volume_restore                    |
+-------------+--------------------------------------+
- After the backup is fully restored your new volume will show as: available.
$ openstack volume list

+--------------------------------------+-------------------+-----------+------+---------------------------------+
| ID                                   | Name              | Status    | Size | Attached to                     |
+--------------------------------------+-------------------+-----------+------+---------------------------------+
| 6b5b8d28-d6c1-4da0-8659-d607670f5ed9 | my_volume_restore | available |  100 |                                 |
| ce29137e-d7d7-45a6-ae63-bb6605af5335 | myvolume          | available |  100 |                                 |
+--------------------------------------+--------------------------------------+-----------+------+--------------+
Attach & Detach volumes from cli
Attach
List all available volumes:
$ openstack volume list --status available

+--------------------------------------+----------+--------+------+-------------------------------------+
| ID                                   | Name     | Status | Size | Attached to                         |
+--------------------------------------+----------+--------+------+-------------------------------------+
| ce29137e-d7d7-45a6-ae63-bb6605af5335 | myvolume | in-use |  100 | Attached to myinstance on /dev/vdb  |
+--------------------------------------+--------------------------------------+-----------+------+------+
- List all instances:
$ openstack server list

+--------------------------------------+------------+---------+--------------------------------+----------------------------+---------------+
| ID                                   | Name       | Status  | Networks                       | Image                      | Flavor        |
+--------------------------------------+------------+---------+--------------------------------+----------------------------+---------------+
| 3e55aef3-09a6-49e8-87ac-779354a1b7cd | myinstance | ACTIVE  | testnet=192.168.30.19          | ubuntu-24.04-server-latest | v2-c4-m8-d120 |
+--------------------------------------+------------+--------+---------------------------------+----------------------------+---------------+
- Attach your restored volume to an instance:
openstack server add volume <Instance ID/Name> <Volume ID/Name>
$ openstack server add volume myinstance my_volume_restore

+-----------------------+--------------------------------------+
| Field                 | Value                                |
+-----------------------+--------------------------------------+
| ID                    | 6b5b8d28-d6c1-4da0-8659-d607670f5ed9 |
| Server ID             | 3e55aef3-09a6-49e8-87ac-779354a1b7cd |
| Volume ID             | 6b5b8d28-d6c1-4da0-8659-d607670f5ed9 |
| Device                | /dev/vdb                             |
| Tag                   | None                                 |
| Delete On Termination | False                                |
+-----------------------+--------------------------------------+
- Confirm the attachment:
$ openstack volume list

+--------------------------------------+-------------------+-----------+------+-------------------------------------+
| ID                                   | Name              | Status    | Size | Attached to                         |
+--------------------------------------+-------------------+-----------+------+-------------------------------------+
| 6b5b8d28-d6c1-4da0-8659-d607670f5ed9 | my_volume_restore | in-use    |  100 | Attached to myinstance on /dev/vdb  |
| ce29137e-d7d7-45a6-ae63-bb6605af5335 | myvolume          | available |  100 |                                     |
+--------------------------------------+-------------------+-----------+------+-------------------------------------+
Detach
- Detach a volume from an instance:
openstack server remove volume <Instance ID/Name> <Volume ID/Name>.
$ openstack server remove volume myinstance my_volume_restore
- Confirm the detachment:
$ openstack volume list

+--------------------------------------+-------------------+-----------+------+---------------------------------+
| ID                                   | Name              | Status    | Size | Attached to                     |
+--------------------------------------+-------------------+-----------+------+---------------------------------+
| 6b5b8d28-d6c1-4da0-8659-d607670f5ed9 | my_volume_restore | available |  100 |                                 |
| ce29137e-d7d7-45a6-ae63-bb6605af5335 | myvolume          | available |  100 |                                 |
+--------------------------------------+--------------------------------------+---------------------------------+
Further reading
3 - Volume migration
Overview
To migrate volume data between Availability Zones (sto1|sto2|sto3) you can use Openstacks backup functionality. This backup process uses our Swift object storage, which is available across all Availability Zones.
- Shutdown the instance whose volume will change Availability Zone. Let’s say it’s in sto1 now.
- Take a backup of the volume (this may take some time, depending on the size of the volume).
- Create a new volume in Availability Zone sto2 and select the backup as the source.
- Create a new instance in Availability Zone sto2 and attach the newly created volume.
To get a more in-depth look at how to perform backup and restore of a volume, follow our Volume Backup & Restore guide.
4 - Volume Retype
Overview
This guide will help you getting started with changing volume type in OpenStack.
For v2 volumes as well as the deprecated ’enc’ volume types you will need to detach the volume from your server before retyping. Either shut down your server or unmount the volume in your operating system before detaching the volume in Openstack.
You cannot change a volume type from v1 to v2 if it has an existing snapshot.
Volume retype from Horizon
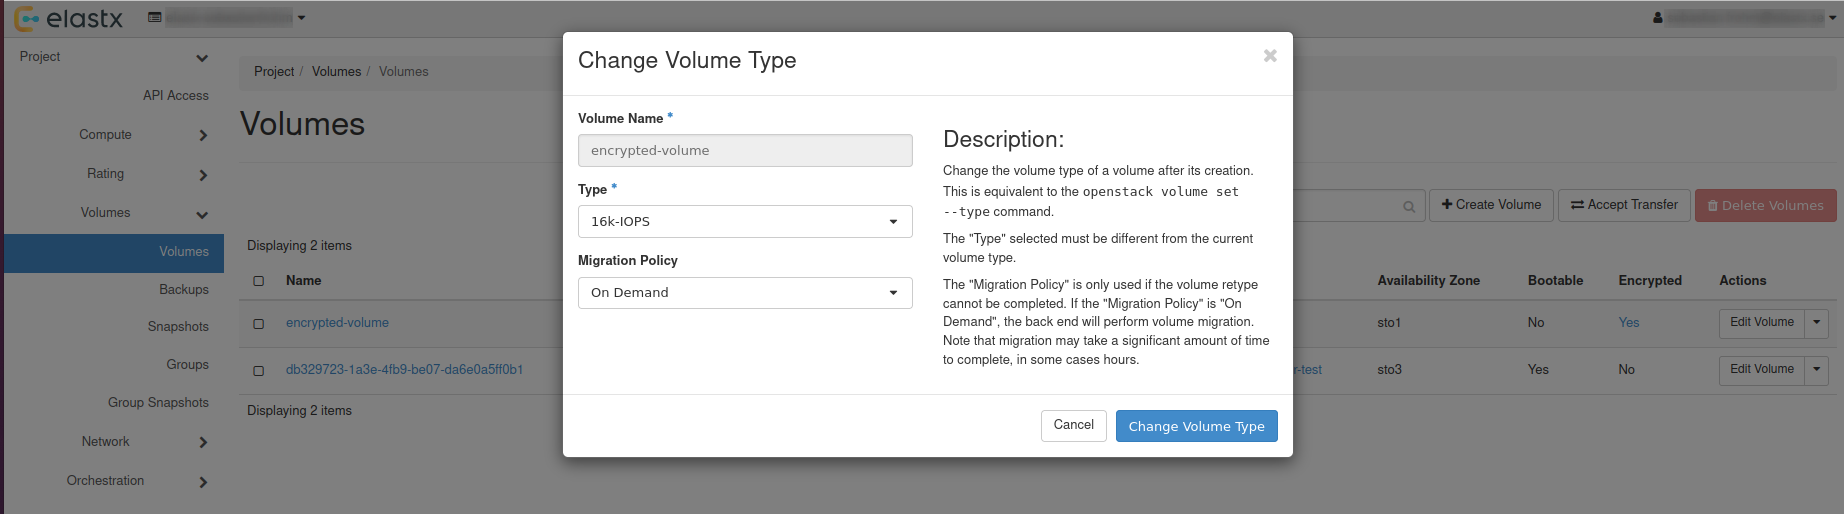
In this example, we will use a detached volume with the type 16k-IOPS-enc.
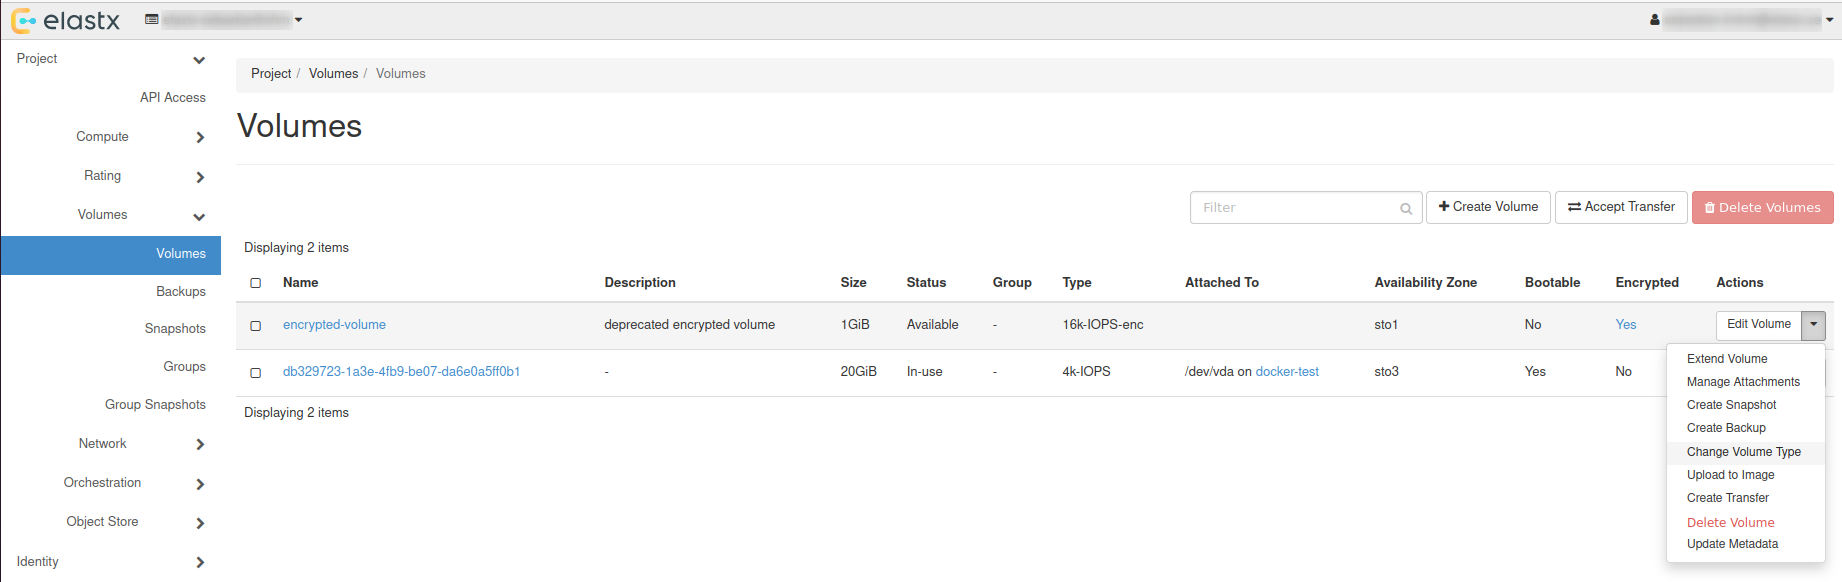
Navigate to “Project” → “Volumes” choose the volume you want to retype and press the ⬇ arrow next to Edit Volume and select Change Volume Type.
Choose Type
In the pop-up window, choose a new type and set Migration Policy to On Demand.
Check status
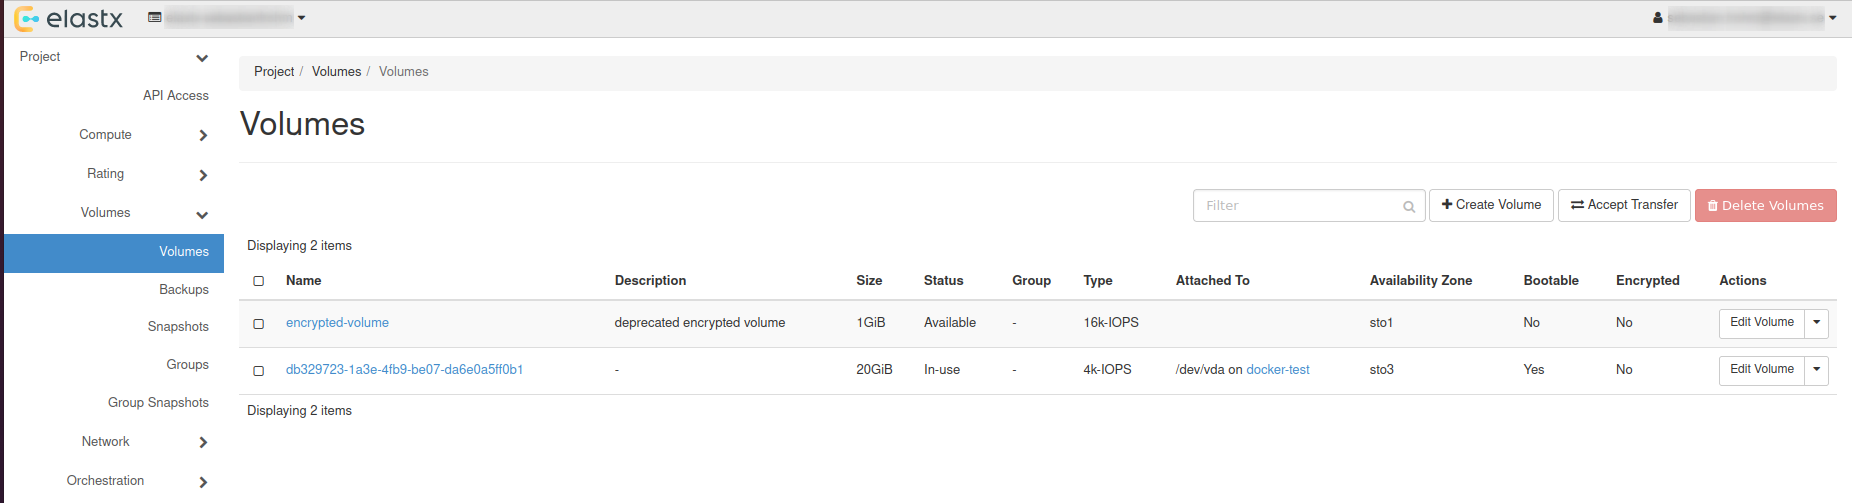
The volume status will change to retyping, this can take a while depending on the volume size.
After everything is done, the volume will have the status available.
Volume retype using OpenStack CLI
List all available volumes: openstack volume list --long.
openstack volume list --long
+--------------------------------------+------------------+-----------+------+--------------+----------+--------------------------------------+--------------------------------------+
| ID                                   | Name             | Status    | Size | Type         | Bootable | Attached to                          | Properties                           |
+--------------------------------------+------------------+-----------+------+--------------+----------+--------------------------------------+--------------------------------------+
| ad2ca224-78e0-4930-941e-596bbea05b95 | encrypted-volume | available |    1 | 16k-IOPS-enc | false    |                                      |                                      |
| db329723-1a3e-4fb9-be07-da6e0a5ff0b1 |                  | in-use    |   20 | 4k-IOPS      | true     | Attached to docker-test on /dev/vda  | attached_mode='rw', readonly='False' |
+--------------------------------------+------------------+-----------+------+--------------+----------+--------------------------------------+--------------------------------------+
Retype volume with: openstack volume set --type <volume-type> --retype-policy on-demand <Volume ID or Name>.
openstack volume set --type 16k-IOPS --retype-policy on-demand ad2ca224-78e0-4930-941e-596bbea05b95

openstack volume list --long
+--------------------------------------+------------------+----------+------+--------------+----------+--------------------------------------+--------------------------------------+
| ID                                   | Name             | Status   | Size | Type         | Bootable | Attached to                          | Properties                           |
+--------------------------------------+------------------+----------+------+--------------+----------+--------------------------------------+--------------------------------------+
| ad2ca224-78e0-4930-941e-596bbea05b95 | encrypted-volume | retyping |    1 | 16k-IOPS-enc | false    |                                      |                                      |
| db329723-1a3e-4fb9-be07-da6e0a5ff0b1 |                  | in-use   |   20 | 4k-IOPS      | true     | Attached to docker-test on /dev/vda  | attached_mode='rw', readonly='False' |
+--------------------------------------+------------------+----------+------+--------------+----------+--------------------------------------+--------------------------------------+
When retyping is done, status will be shown as: available.
openstack volume list --long
+--------------------------------------+------------------+-----------+------+----------+----------+--------------------------------------+--------------------------------------+
| ID                                   | Name             | Status    | Size | Type     | Bootable | Attached to                          | Properties                           |
+--------------------------------------+------------------+-----------+------+----------+----------+--------------------------------------+--------------------------------------+
| ad2ca224-78e0-4930-941e-596bbea05b95 | encrypted-volume | available |    1 | 16k-IOPS | false    |                                      |                                      |
| db329723-1a3e-4fb9-be07-da6e0a5ff0b1 |                  | in-use    |   20 | 4k-IOPS  | true     | Attached to docker-test on /dev/vda  | attached_mode='rw', readonly='False' |
+--------------------------------------+------------------+-----------+------+----------+----------+--------------------------------------+--------------------------------------+
Further reading
5 - Windows volume offline after restart
Issue description
In certain circumstances, extra disks can be marked as offline after a hard reboot is performed and have to be manually brought online again.
By default Windows machines will have the SAN policy set to be “Offline Shared”, thus in most virtualization platforms this issue will occur when a disk is completely shut down and started again.
The reason behind this is that the disk may be assigned to a different virtual PCI device in the underlying host which causes the OS to block the volume from going online automatically when using the default policy.
Change SAN policy
The easiest way to change the SAN policy is using diskpart in a command shell or powershell prompt.
-
Enter diskpart
diskpart -
To display the current SAN policy, simply run the following command
san -
Change SAN policy
san policy=OnlineAll
Restore offline volume state
When attempting to initialize a volume you may be seeing the following error
The disk is offline because of policy set by an administrator
-
Start by listing disk information to find out which disk is offline.
list disk -
Select the offline disk.
select disk 1 -
Clear the read-only attribute for the selected disk.
attributes disk clear readonly -
To check that the read-only attribute has been cleared, run the following command.
attributes disk -
Bring the selected disk online again.
online disk